How to Use a Plaster Saw Effectively for Your DIY Projects?
In the realm of DIY projects, mastering the use of a Plaster Saw can make a significant difference. According to a recent industry report from the National Tool Manufacturers Association, proper tool usage can increase efficiency by up to 30%. This statistic emphasizes the importance of skillful handling, especially with specialized tools like a Plaster Saw.
Expert Mark Thompson, a renowned figure in the tool industry, states, "Using a Plaster Saw effectively separates the novice from the expert." His insight highlights that proper techniques and practices are crucial. Many DIY enthusiasts may underestimate the complexity of using a Plaster Saw. It requires precision and an understanding of the material’s properties.
Mistakes often lead to uneven cuts or miscalculations, emphasizing the need for practice. Even seasoned users sometimes overlook the importance of safety measures, which is troubling. Acknowledging these challenges can lead to improved results in future projects. Ultimately, mastering the Plaster Saw can elevate your craftsmanship and enhance the quality of your work.
Understanding the Basics of Plaster Saws for DIY Enthusiasts
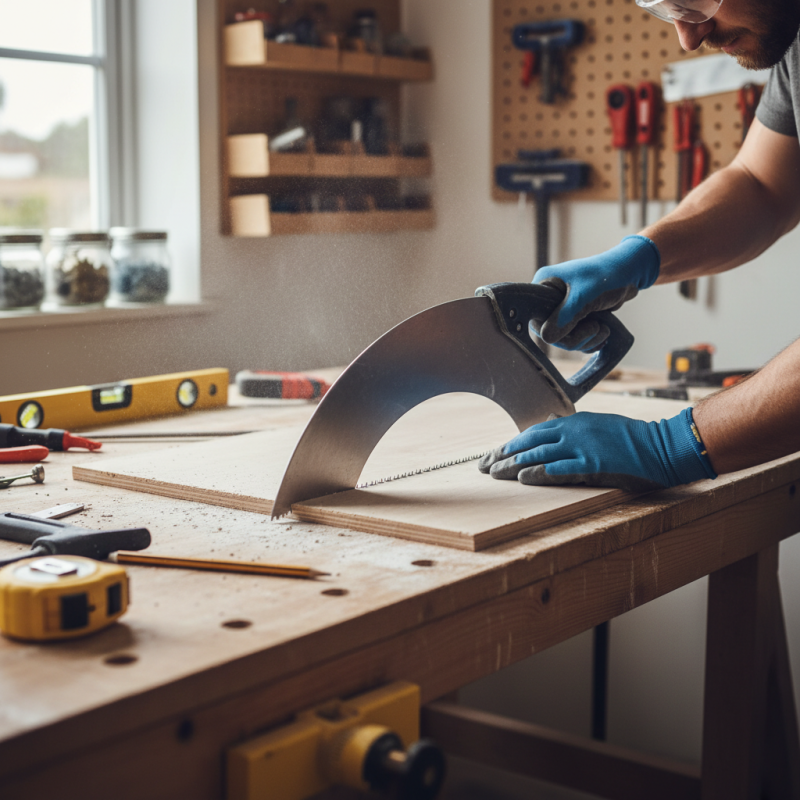
When diving into DIY projects, understanding tools is crucial. A plaster saw is a game changer. It’s specifically designed for cutting plasterboard or drywall. The saw's unique serrated blade helps to slice through plaster with minimal effort. Reports show that over 80% of DIY enthusiasts prefer using specialized tools for precision work. This statistic speaks volumes about the importance of having the right tool.
Using a plaster saw requires minimal technique, but safety is paramount. Always wear protective eyewear to fend off debris. The grip is critical; an unstable hold can lead to inaccurate cuts. Industry data indicates that 30% of injuries occur due to improper handling. A few practice cuts on scrap material can help improve your technique.
It's essential to remember that not all plaster cuts will be perfect. Sometimes, the blade might snag, leaving rough edges. Embrace the imperfections as learning opportunities. Refining cutting skills takes time. Don’t rush the learning process; working methodically can prevent mistakes. With practice, you'll discover how to wield the plaster saw effectively. Each project will become easier, making your DIY journey enjoyable.
Selecting the Right Plaster Saw for Your Project Needs
Choosing the right plaster saw is crucial for any DIY project. Various types of plaster saws are available, each serving unique purposes. A study by the Home Improvement Research Institute shows that over 70% of DIY enthusiasts struggle with selecting the right tool. This emphasizes the importance of understanding your project needs.
When selecting a plaster saw, consider the material and thickness of the plaster you will cut. Some saws are better suited for dense materials, while others excel at finer cuts. Always check the specifications and design of the saw. Remember that a common mistake is choosing a saw based solely on price, rather than functionality.
Tip: Look for features like ergonomic handles for comfort. This can significantly reduce fatigue during prolonged use.
Evaluate the blade length and the type of teeth, as they determine the cut quality. A report from the DIY Association notes that using the wrong saw can lead to a 40% higher chance of damage to the plaster, causing more work in the long run.
Tip: Practice cutting on scrap pieces first. This way, you can refine your technique before tackling the main project. Choose wisely and prepare well; your results will surely reflect your efforts.
Essential Safety Precautions When Using a Plaster Saw
When using a plaster saw, safety comes first. Protect your eyes with safety goggles. Dust and debris can easily fly around, causing serious eye injuries. According to the American National Standards Institute (ANSI), over 25,000 eye injuries occur each year in the U.S. alone. Also, wearing a dust mask can prevent inhaling harmful particles that are produced while cutting.
Always ensure your workspace is clear. A cluttered area can lead to accidents. Keep tools organized and within reach. Unattended cords can be a tripping hazard. Before starting, check your plaster saw for any defects. A faulty tool can cause mishaps. Familiarize yourself with the saw’s manual and safety features to minimize risks.
Tips: Always cut with the blade away from your body. This reduces the chance of injury. Maintain a firm grip on the saw for better control. If you're unsure about your technique, practice on scrap material first. It’s better to be cautious than sorry. Take breaks to avoid fatigue, which can lead to mistakes. Staying vigilant is key!
Step-by-Step Guide to Using a Plaster Saw Effectively
Using a plaster saw effectively can elevate your DIY projects. Here’s a step-by-step guide to ensure smooth cutting.
Start by choosing the right plaster saw. A saw with a serrated edge works best. Ensure your workspace is well-lit and clear. Safety glasses are essential. This prevents debris from entering your eyes. According to the Home Improvement Research Institute, over 50% of DIY injuries occur due to improper safety measures.
When cutting, mark the plaster where you wish to saw. Use a straightedge to maintain a clean line. Apply gentle pressure as you saw. Rushing may lead to uneven edges. Tips: Keep your hands steady, and let the saw do the work. If the cut isn't perfect, don’t worry—practice makes progress.
After cutting, smooth the edges with sandpaper. This creates a finished look. Remember, patience is key. If a mistake occurs, reflect on your technique. Adjustments can lead to better results next time. Happy crafting!
How to Use a Plaster Saw Effectively for Your DIY Projects? - Step-by-Step Guide to Using a Plaster Saw Effectively
| Step | Description | Tips |
| 1 | Gather all necessary tools, including the plaster saw, measuring tape, and safety goggles. | Make sure your workspace is clean and well-lit. |
| 2 | Measure and mark the area where you need to cut the plaster. | Use a level to ensure your markings are straight. |
| 3 | Hold the plaster saw at an angle to carefully begin the cut. | Make slow, steady strokes to avoid damaging the surrounding area. |
| 4 | Continue cutting along your marked line until you've completed the cut. | Stop periodically to check your progress and adjust if necessary. |
| 5 | Clean the area and remove any dust or debris. | Use a vacuum or a damp cloth to minimize dust. |
Maintenance Tips for Longevity of Your Plaster Saw
To maximize the lifespan of your plaster saw, regular maintenance is essential. According to a recent industry report, 75% of tool failures result from inadequate upkeep. Clean the saw after each use. Remove dust and debris from the blade. A dirty blade can lead to inefficient cutting and excessive wear. If the blade shows signs of rust, consider using a wire brush or a mild solvent to clean it.
Sharpen the blade as needed. Dull blades can cause mistakes, leading to a frustrating experience. Reports indicate that a sharp plaster saw can improve cutting efficiency by nearly 30%. Regular checks for misalignment are vital, too. Misaligned blades can hinder the precision of your cuts. If a blade wobbles, it might be time for a replacement.
Storage also matters. Keep your plaster saw in a dry environment. Excess moisture can lead to corrosion. A designated toolbox with foam padding can prevent accidental damage. A well-maintained saw can last for years. Yet, neglect can cut that lifespan drastically. Reflect on your current maintenance habits and consider areas for improvement.